
Learn how to remove a stuck light bulb or a broken one by following the steps I would be showing you. Do you know the Potato trick? You break the bulb in half, push it up the base and it comes out.
That trick only exists in my mind. Removing a stuck light bulb may not be as simple as you think. Most times we are scared to get ourselves injured.
One simple fact we can establish now is that bulbs break. Some bulbs have a good base for removal while some don’t.
After a few trials here and there you might become frustrated. You might find yourself in a hurry situation.
Making use of the right skills would save time and stress. That is why it is important to understand these bulb-switching techniques.
How to Remove a Light Bulb from a Recessed Socket?
- The first step is to be sure the power is off.
- The second step is to put on gloves and safety glasses.
- The final step is to decide on a method to extract it. (Potato, Glue, Bottle, Duct Tape…)
What’s the Reason For Removing it?
There are several reasons for removing a light bulb in general. Some or many of the reasons include:
- Changing for aesthetic purposes
- When a bulb burns out
- When a bulb breaks due to external or deliberate force
Is it broken or want to change the usual decorating purpose?
Changing bulbs could be for many reasons. But when it is broken it requires immediate attention. At this point, we should consider the type of bulb.
There are several types of bulbs. We have the Halogen light bulb, Fluorescent light bulb, Compact Fluorescent light bulb, and the LED light bulb.
The Light-emitting diode (LED) is the newest and the most improved form of lightning. Placing the right bulb in the right position can give your house the beauty it deserves.
For example, if you need to decorate your door and window frames. Especially during the holiday season you can place LED strip lights up and down.
Beautify the outdoors with LED lights that are weather friendly. And you can also alternate the colors too.
Different Ways of How To Remove A Stuck Light Bulb
Before I begin to describe any procedure, I must warn that you should cut off any power supply.
To avoid electrical shock and any other electrical mishap, make sure you turn off the switch.
That is the first and most important trick. You must be completely sure that there is no power going in.
- Safety, safety, and safety.
- Recognize the method suitable for your kind of bulb.
01. The Plier Method
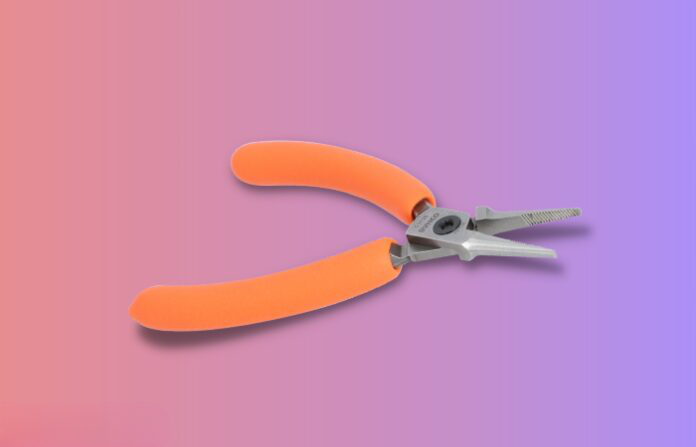
This is a tried and true method of removing a stuck light bulb from the socket. Use a pair of needle-nose pliers for gripping.
Make sure you grip the base of the bulb filament firmly. Then twist it counter-clockwise.
While you are doing this, the base will break free from the threads. I need to mention here that the filament can also break.
If or when this happens place the nose pliers on the opposite side of the bulb base. Twist and turn clockwise and begin to unscrew.
Do not use a great amount of force as this may break the bulb and/or lampshade. Also, there is no need to remove the entire light fixture from the ceiling. That’s an enormous waste of time and energy.
02. The Potato Method
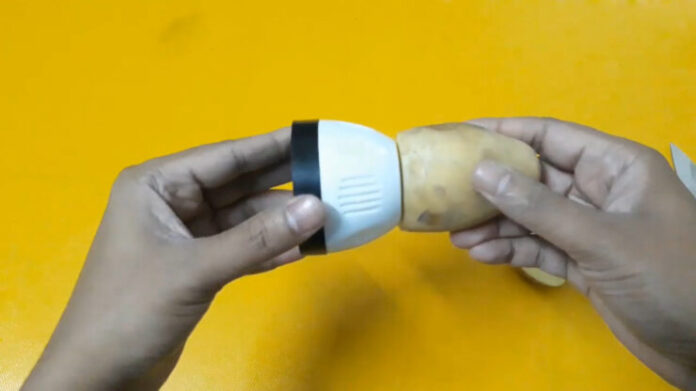
You probably thought it was a joke when I mentioned that earlier. This is the oldest trick to remove a stuck light bulb.
Find a raw potato. Safety first, make sure you turn off the light. Use gloves and eye protectors.
Now instead of using the pliers to twist you use it to break the bulb glass. Slice the potato into half.
Then press it gently against the socket and twist it counter-clockwise. To make the grip stronger you can wrap the base of the potato with electric tape.
03. Melted Soda Bottle Method
First, remove the cap from the soda bottleneck. Then heat source preferably a stove or lighter to melt the tip.
Till it becomes shaped like a cone. Allow the bottle to cool. After switching off the light, press the bottle into the base of the light bulb.
And you twist firmly counter-clockwise. Dispose of the light bulb base and keep the bottle for future use.
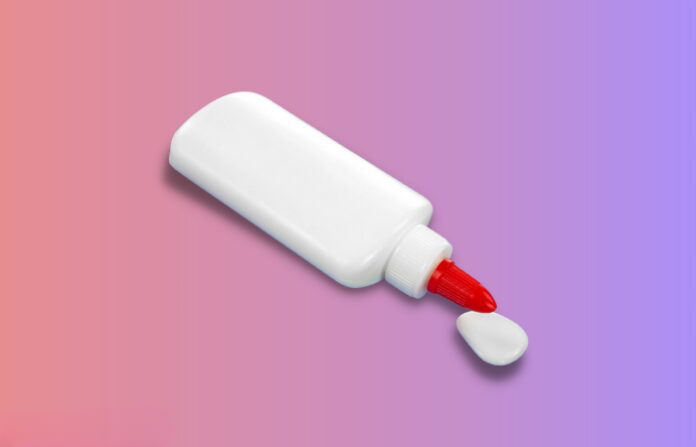
04. Glue Method
Bulb base can get really stubborn. When they are they become hard to remove even with the method mentioned above.
The glue method requires you to use a ½ x ½ inch wooden stick. Apply a huge blob of hot glue to the tip. Stick it into the broken bulb’s base.
Let it cool for some minutes and turn counter-clockwise to remove the bulb.
04. The Broken Bulb Extractor Method
This is the official process of removing a broken bulb. Visit your local hardware store and purchase a broken bulb extractor for $10-$15.
It is simple to use as the process is similar to all other methods. Insert the bulb extractor to the base and grip it firmly. Turn counter-clockwise.
05. Water bottle Method
- Turn off the light
- Double-check and unplug all electricity coming in.
- Get an empty water bottle to remove the cap and the little ring in the neck
- Remove the cap and break the ring around the neck
- Heat the threaded section till it gets soft. Allow it to cool
- Place the melted section or hole into the bulb base and pull it out.
06. Duct Tape Process
If you are finding it hard to remove a bulb from the base without breaking it. This method is for you.
Remove a stuck or stubborn light bulb without damaging it.
The first step here is to put off the light and any unit bringing in electricity into the house.
Let the bulb cool before doing anything. Next, you tear off a strip of duct tape and attach it to the ends of the bulb.
Make sure you close in the adhesive side on the bulb. Remember that the loops of duct tape should be placed over the bulb.
Flatten the sides inward till you can have two handles of tape on both sides. Finally, grab the ends of the tape and twist counterclockwise.
Steps Simplified
- Turn the power off and allow a light bulb to cool. You should wait for about two minutes or more.
- Cut the duct tape and make that loop. The loop should be fixed to the ends carefully placing the sticky side inwards.
- Make handles with the loop tape. When you are placing the tape on the bulb lower the tape downwards. When it reaches the center of the bulb’s side you pinch the remaining arms together.
- By doing that you would have formed two long strides by the side of the bulb.
- Make sure you are making use of work gloves during this process.
- While gripping the ends between your thumbs and index, start twisting counterclockwise.
- This process would loosen the bulb from the strong base.
06. Drill
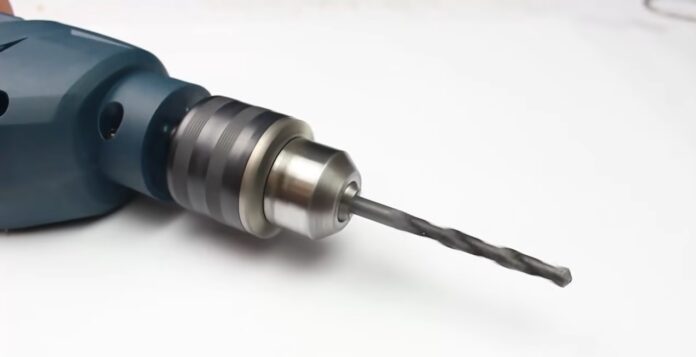
Now for those who are looking for an even more convenient way of removing stubborn lightbulbs…try using a cordless drill! First, attach the appropriate sized bit to your drill then insert it into one of the slots on the headlight rim (or whichever part of the fixture that slides off).
Push down slightly on the handle while turning counterclockwise until it starts to loosen, then keep going until it comes loose.
If you have trouble getting the bit inside one of its slots, simply wrap a rag around your fingers/hand and push it in with your hand. This will give you maximum hold and control (not to mention added protection).
07. Use Rubber
For those that want some added support or assurance on whether they’re turning correctly or not, you can purchase a rubber-grip handle for $4 – $7 at any hardware store. There are many different styles and sizes so be sure to get one that will fit your hand properly (no pun intended).
You can also make one by simply sticking a layer of thick rubber (old tire, bicycle tube, etc.) over the area where you grip around the traditional metal handle; however, this method is not advised, especially when removing hot lightbulbs. Doing so may give you second-degree burns due to the heat of the bulb itself.
Broken Bulb Removing Process
In learning how to remove a stuck light bulb, we must understand the process involved. The broken change process is divided into four major steps.
- First is Safety: I would continue to stress safety partly because it is very important.
- You can injure your fingers if you aren’t careful enough. That is why we must wear protective gear.
- Put on work gloves. Be sure that the little children are not in the way.
- Lay a blanket or a bag on the flow to catch the broken glass that may fall off.
- The second step is unscrewing. Always unscrew counter-clockwise.
- Pulling out carefully: The next step in the ever change process is to pull out the bulb base carefully. When doing this, make sure the bulb filament doesn’t break.
The untapped techniques of using ring lights for photography.
Stuck Socket Solution
Sometimes when a bulb is stuck in its socket you may have a hard time removing it without breaking it.
You can remove the bulb from the socket without breaking or destroying the bulb.
First, unplug the bulb completely or turn off the power of your home. You can do this at the breaker box.
Remember to have your gloves and eye protection on.
Take a piece of cloth and place it over the bulb gently then twist counter-clockwise to remove.
If it doesn’t come off, you can infuse a rubber jar opener to the base while you gently twist counterclockwise to get it out.
How to Remove the Metal Part of a Stuck Light Bulb
Now the light bulb may be in a frozen state. Whenever this happens, put off the bulb first.
Allow it to cool then you wad up a square of paper towel.
Next, stuff the paper towel tight into the base of the bulb having enough of the towel sticking out.
With a good grip on your fingers, you should be able to do some little pulling.
The material left inside would be enough for you to grab the side of the paper and wad it with your fingers.
You can also make use of pliers to twist the towel counter-clockwise.
What happens when you do so is that the paper would grab the inner surface. And also grab the bulb out.
It is a quick and easy method.
However, the base can be tighter than you think. Then you would have to use the second method.
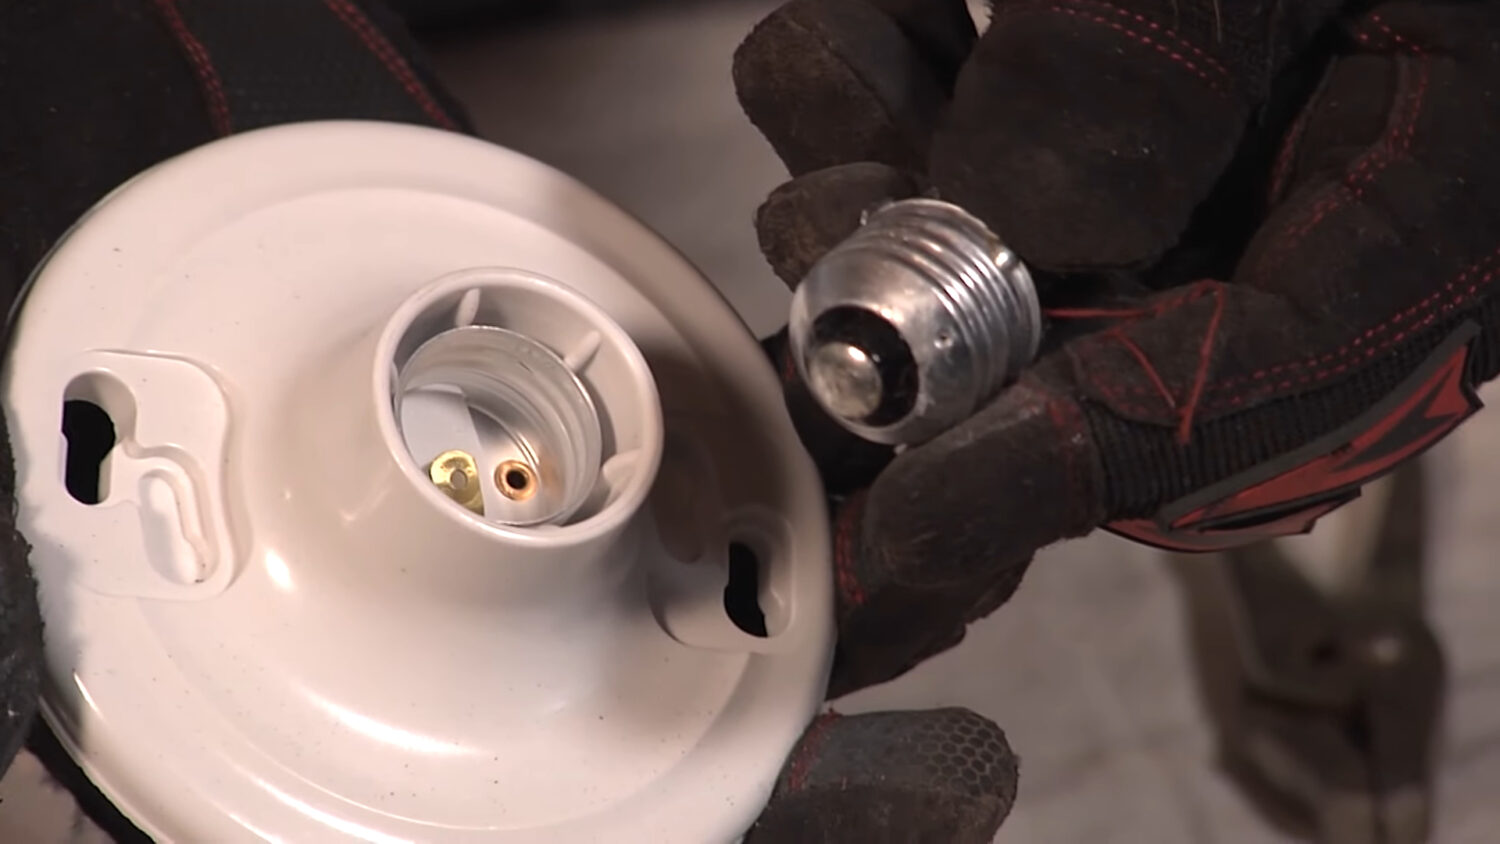
The next method is to use a pair of nose needle pliers. When the base adheres strongly to the socket. Make use of the pliers to grab the metal base.
The base of the bulb is either brass or aluminum and it is usually thin.
It is simple to pull it up a bit and grip with the needle-nose pliers. You hold the pliers tightly and then turn it counter-clockwise.
How to Remove the Broken Light Bulb From a High Ceiling
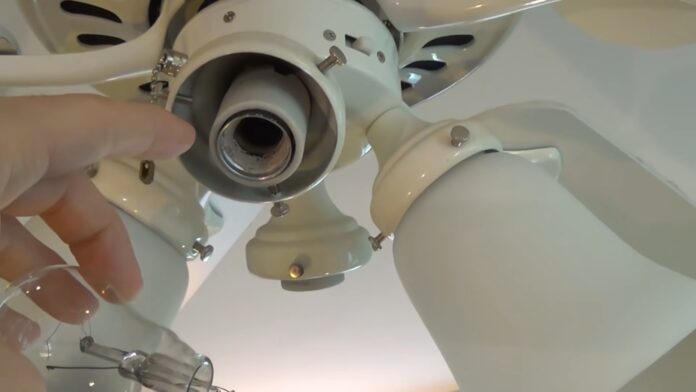
Removing a broken light bulb from the high ceiling can be a little tricky. You would have to use the safest, easiest, and simplest method.
You wouldn’t want to stay long on the ladder because it isn’t safe.
The first thing to do is to turn off the bulb. After turning off the bulb make sure you switch off all current from the fuse box. The next step is to choose the right ladder.
Find one of your sizes. Yes, the ladder has sizes, consider your height and weight when using one. I recommend safety ladders.
Pick the one that has enough height. Do not use stools or chairs.
Have someone hold the ladder in place while you are climbing and fixing. Never make a ladder switch alone.
Protection and safety are next on the list. Yes, put on leather gloves and place the ladder right.
There should be enough fitting for you to work freely.
Don’t forget to place a paper bag beneath for the broken pieces. You can either use the needle-nose pliers to pull it out gently or make use of the potato.
I recommend the potato because it is very fast in that position.
Safety Tips for Removing a Stuck Light Bulb
I would continue to emphasize safety because of its importance
- Do not make use of equipment without training or authorization. Equipment like ladders and scaffolds.
- Always inspect your equipment for defects or rust before you begin to use it.
- Your equipment must be in good condition before you attempt any of these processes mentioned. Repair them if they are in bad condition.
- Never try to fix or replace a bulb having current running through the fixture.
- Inspect the bulb socket and holder for damage before you begin to work. Never try to remove a bulb from any damaged socket or fixture on your own.
- Never make use of excessive force when removing a bulb.
- If you find yourself using excessive force, you are on the verge of having an injured finger.
- Make use of the right size, type, and wattage when you want to replace the bulbs.
- Snap or search for the exact picture and specification of your bulb online. You must never exchange any bulb without having its replacement.
- Make use of the right lifting techniques and body position. Keep your knees bent and keep straight.
- Dispose of used or broken bulbs carefully.
For live-streaming youtube video read the content for tips.
Tighten the new lightbulb by hand
Use your hand to tighten it until you feel it’s tight enough, but do not overtighten. Also, remember never to use a screwdriver in the fixtures as that could prove fatal!
Employing these steps can help save money and injury if followed correctly.
FAQs

Is it safe to use WD-40 or any other lubricant to remove a stuck light bulb?
Using a lubricant like WD-40 can help to loosen a stuck light bulb, but it should be used with caution. Ensure the power is turned off and the bulb is cool before applying the lubricant.
Avoid using an excessive amount, as it may cause the bulb to slip from your grip or create a fire hazard. Always wear gloves and eye protection when using a lubricant to remove a stuck light bulb.
What should I do if I am unable to remove a stuck light bulb using the methods mentioned above?
If you are unable to remove a stuck light bulb using the methods above, it is best to call a professional electrician for assistance. They have the necessary tools and expertise to safely remove the bulb without causing damage to the socket or fixture.
Can I use these methods to remove a stuck light bulb from a chandelier or other hard-to-reach places?
The methods mentioned above can be used to remove a stuck light bulb from a chandelier or other hard-to-reach places. However, extra caution must be taken when working with chandeliers or other delicate fixtures.
It is crucial to use a stable ladder and have someone hold it in place while you work. If you are uncomfortable or unsure about removing the bulb yourself, it is best to call a professional electrician for assistance.
How do I remove a stuck light bulb from an outdoor fixture?
Removing a stuck light bulb from an outdoor fixture follows the same basic steps as removing one from an indoor fixture. Ensure the power is turned off and the bulb is cool before attempting to remove it.
You may need to use additional caution when working with outdoor fixtures, as they may be more prone to rust and corrosion. If you encounter difficulty, consider calling a professional electrician for assistance.
What should I do if the light bulb breaks while I am trying to remove it?
If the light bulb breaks while you are trying to remove it, turn off the power immediately and allow the fixture to cool.
Wear gloves and eye protection to prevent injury from broken glass. You can then use one of the methods mentioned above, such as the potato method or the needle-nose pliers method, to remove the remaining base of the bulb from the socket.
How can I prevent light bulbs from getting stuck in the future?
To prevent light bulbs from getting stuck in the future, avoid over-tightening them when installing. Stop turning the bulb once you feel slight resistance.
Additionally, applying a small amount of bulb lubricant to the threads of the bulb base can help prevent it from becoming stuck. Always use the correct type and size of bulb for the fixture to minimize the risk of damage or breakage.
Conclusion
Begin to pay attention to how you tighten your bulb. Never over-tighten bulb light.
This could be the reason the bulb base is stuck in the socket.
And it may also be why most of your bulb breaks. When you are turning the bulb, stop when feeling any little resistance.
Do not force the bulb into its socket. And for ease make use of a bulb lubricant.


