
Before using low-voltage lighting you should know to troubleshoot low-voltage landscape lighting.
To light up the landscape around your home can be a great idea, It will light your path at night and will be a project even novices can take on.
So, if you’re looking for outdoor lighting solutions that don’t consume too much energy, this is an option worthy of your consideration.
However, there are cases when your low-voltage landscape lighting won’t work.
To remedy the problem, you will need to identify it first. This guide will offer detailed information on this matter.
What is low-voltage landscape lighting?
We all have lights inside the house that helps us get through the dark easier.
These lights use 120 volts of power in order to work. Unlike regular lights, low-voltage lights require a much lower level of energy to function.
More precisely, low voltage landscape lighting takes only 12 volts to provide light.
Due to this, setting up low voltage lighting is something anyone can do, without any previous experience.
The entire process is safe because you won’t work with dangerous electrical wires. Also, you’ll need just a few components to make it work.
Why low voltage transformer used for landscape lighting?
You will need a power source for your landscape lighting and you can use the same power source that powers your home.
But you will need something to reduce the available power to just 12 volts.
This is where the transformer comes into the scene.
Getting a transformer is a must, as it is the central piece of your future low voltage landscape lighting.
You won’t be able to properly power a low voltage landscape lighting without a transformer that will provide it with an adequate level of power.
However, when choosing the transformer, you will use for your landscape lighting project, you’ll need to bear in mind the watts each light will consume.
Ad the wattage of each light or multiply the value of the wattage with the number of lights, if they are all the same, and see how much power your transformer should provide.
For example, if the sum is 300 watts, you will need a transformer capable of developing 400 or 500 watts.
This way, you make sure that all the lights will work properly when turned on.
Troubleshooting Low Voltage Landscape Lighting
Sometimes, no matter how careful you are to respect all the steps for installing low voltage landscape lighting, things appear to go wrong.
The lights may not turn on, in spite of the fact that everything looks alright.
Or, even if the lights turn on, they appear to be dim instead of showing all their power.
No matter what the issues appear to be, it can be frustrating to see that you can’t enjoy the results you were hoping to get.
Also, finding the issue in order to address it is not always easy. Arm yourself with patience and start checking your low-voltage system to discover the problem that may be causing the malfunctions.
01. The lights are not turning on at all
Noticing that the lights fail to turn on once you’re done installing the entire system can be very frustrating.
When it comes to this scenario, the factors that lead to it are rather numerous.
Ideally, to avoid this from happening, you should be careful how you do the installment right from the start.
If everything is set up correctly, the chance for troubleshooting scenarios to occur is reduced.
If you are experiencing this particular scenario, the first thing you need to check is to see whether the transformer is connected to a power source and if it has power.
A transformer that does not work will not allow the lights to turn on. In case you come to the conclusion that the transformer has power, but the lights still don’t work, a short maybe shut it down.
We will describe the short in detail later on.
Bear in mind that you are dealing with a circuit, so if a light doesn’t work, the entire lighting system won’t work.
So, if the transformer is properly powered, start checking the light bulbs. Check for broken filaments or lights that are not sitting right in their socket.
02. There’s a short on the circuit
There are many factors that can cause a short on circuit.
You will need to check the entire system to see whether you’re dealing with a short and if so to check what’s causing it, so you can properly repair it. What can lead to a shortage?
It can be a socket that got damaged, corroded, or exposed to water.
It can also be a wire with a cut on its surface, a wire connection that failed, portions of the system that have been exposed to too much moisture or water, or portions that got damaged as a result of rubbing against trees or rocks.
Of course, the cause of a short can be different than the mentioned examples. The main idea is that you need to find the cause and replace or repair the damaged part.
03. The lights are dim
Dim lights can be frustrating, but they can indicate a connection that is not done properly.
So, the first thing you need to do is to check if the lamp or lamps are properly connected to the socket.
If there’s any room to wiggle, the lamps will provide a dim light. You should also check the connection of the power cable. A proper connection should show pins that pierced the copper strand nicely.
Sometimes, even a detail this small can make an entire system work poorly.
Is the value of your voltage drop 2.0 volts? You should calculate this part again and make sure it does not exceed this value.
Also, check the total wattage of the system. If the value is above the recommended value, you will have to remove one or two fixtures from the circuit or use fixtures that have a lower wattage.
04. Lights are burning off at a premature rate
When you buy a certain type of light, you probably know that they have an average period in which they should function.
If the lights are burning off at a premature rate, making you replace them more often than you should, you may be dealing with system issues.
Even if you don’t buy the most expensive lights, you should still be able to use them for a good period.
If you don’t, there might be too much voltage on the cable, which leads to premature burning off of the lights.
First, check the number of functioning hours in the case of your lights.
In case you’re dealing with short-life lamps, seriously consider getting halogen lights instead.
Or drop the voltage of the affected cable by increasing the wattage load or drop the run of the cable down to the next lower voltage tap.
The top choice of YouTubers for live streaming.
Features of low voltage landscape lighting
They are an affordable solution for outdoor lighting
If you’re looking for outdoor lighting solutions, but you’re working with a budget, low-voltage landscape lighting can be just the thing you’re looking for.
These lights are not just affordable in terms of purchasing them, but also for long-term maintenance.
If you install a low voltages system correctly, it won’t cause any problems.
Also, considering that it will use bulbs that have a power of just a couple of watts, the incoming energy bills will not give you a headache.
They are safe and easy to install
The best part about opting for low voltage landscape lighting is that you can install it on your own.
You don’t need to pay a professional or electrician to make this happen.
There’s no need to have any previous experience or knowledge to take on such a project. You just need to follow a set of simple steps and you’ll save money on its installation.
Will offer a rapid return on investment
Low-voltage landscape lighting costs very little but is capable of increasing a property’s value fast.
If you plan on selling a property, installing affordable low-voltage landscape lighting will definitely make it more valuable and will attract more potential homebuyers.
But even if you do this for your own enjoyment, the reduced costs of getting, installing them, and maintaining such a system will help you save money, in comparison with other similar outdoor lighting systems.
Bring an aesthetic improvement to the property
Considering that you won’t spend too much money on such a lighting system, do your best to find light bulbs of a better color than the ones usually provided by an outdoor lighting system.
This will certainly add a plus to the aesthetics of your property.
Not to mention that the smaller size of the fixture will merge well with the outdoor elements, being discreet yet effective in creating a beautiful mood.
Also, you are free to re-arrange the light bulbs whenever you feel like it, enjoying the desired effects each time.
Pros & cons of using low voltage landscape lighting
Pros
You can save money by installing the lighting fixture yourself. You’ll save money that would otherwise go on paying someone else to do this job;
The wires are light and thin, so they can be easily burrowed in the ground, hung in trees, on the house’s walls, and so on.
It is very easy to make the lights discreet and create the kind of atmosphere you desire;
It is a very safe solution because the fixture requires a low number of volts. At only 120 volts, there are no risks of suffering from electric shocks.
Also, the transformer is placed in a sealed box and you really don’t need an electrician to install the system;
Unlike systems that use solar power, a low voltage landscape lighting will offer the same degree of light, regardless of the weather;
It is a rather versatile solution. If you want to move a light or add more to the system, you just need to make sure that the transformer you use can take it.
Cons
The lights may not be as bright as you may wish. After all, it’s a low-voltage fixture, so it’s normal to be less bright than high-voltage systems;
Moving the lights may not be that easy, as the light bulbs depend on wiring to work.
Solar lights, on the other hand, are independent and you’re free to place them as you wish and move them whenever you want;
You will have to run wiring for the entire system, so you may have some trouble figuring out where to place the wiring and how to make the system work for you;
You might still need an electrician, for the installment of an outlet on the outside of your home or wherever you want to have the power source for the entire system;

Costs and where to buy it
Finding low-voltage landscape lighting is very easy. You can find it online and in regular, brick-and-mortar home improvement stores.
Just make sure to check the specifications of the products before purchasing them.
When it comes to costs, each light fixture can cost between $60 and $130.
You will have to add this to the number of light fixtures you need to obtain the desired results.
When it comes to costs, the final amount of money you will pay on the lighting fixture depends on several factors.
The type of bulbs you will choose if there’s any landscaping where you’re about to install the system if you’ll need a new circuit installed and if you’ll hire an electrician or not.
In terms of light bulbs, halogen lights are the cheapest option, with bulbs costing between $4 and $10.
LED is more durable and brighter, but also more expensive, with prices ranging between $20 and $40 per piece.
If there’s a landscape around your property, you may need more wiring and additional materials, such as tools and accessories to hide and fix the wiring and lights.
As you can tell, this will add to the final costs. If there’s no existing circuit you can use, you will have to get a new one installed. This will add anywhere between $200 and $300 to your final costs.
Finally, if you want to hire an electrician for the job, you’ll reach even deeper into your pockets.
Just make sure to ask for quotes from several electricians before you make a final choice.
Read more about the tips of ring light photography.
How to install outdoor landscape lighting
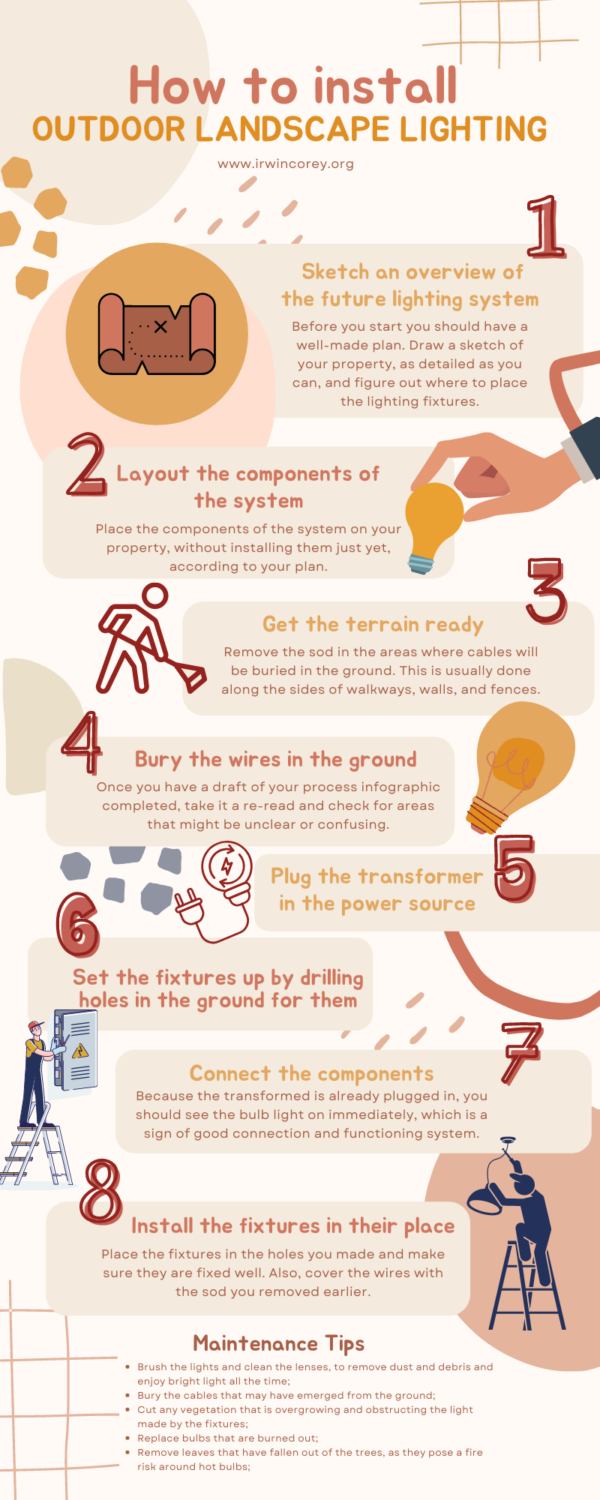
01. Sketch an overview of the future lighting system
Before you start you should have a well-made plan. Draw a sketch of your property, as detailed as you can, and figure out where to place the lighting fixtures.
As a general rule, lighting fixtures should be placed next to walkways, along the walls and fences, and pointing toward trees.
02. Layout the components of the system according to the plan you made
Place the components of the system on your property, without installing them just yet, according to your plan.
This will let you see if you have everything you need, including sufficient wiring, or if the plan will work well.
03. Get the terrain ready
Remove the sod in the areas where cables will be buried in the ground. This is usually done along the sides of walkways, walls, and fences.
04. Bury the wires in the ground
With the sod out of the way, it’s time to place the wires down, as planned.
05. Plug the transformer in the power source
06. Set the fixtures up by drilling holes in the ground for them
Prepare the holes for the lighting fixtures. Set the fixtures at 8 to 10 feet away from one another.
07. Connect the components
Now that everything is set in place, make all the necessary electrical connections.
Because the transformed is already plugged in, you should see the bulb light on immediately, which is a sign of good connection and functioning system.
08. Install the fixtures in their place
Place the fixtures in the holes you made and make sure they are fixed well. Also, cover the wires with the sod you removed earlier.
Maintenance Tips
- Brush the lights and clean the lenses, to remove dust and debris and enjoy bright light all the time;
- Bury the cables that may have emerged from the ground;
- Cut any vegetation that is overgrowing and obstructing the light made by the fixtures;
- Replace bulbs that are burned out;
- Remove leaves that have fallen out of the trees, as they pose a fire risk around hot bulbs;
FAQ
What’s the best outdoor landscape lighting?
The best outdoor landscape lighting is the one that works best for your property. To figure this out, you will need to make a plan before buying everything you need.
This means that you’ll have to decide where to install the lighting fixtures and see how much cable you need by measuring the distances between the lighting fixtures and up to the transformer as well.
How can we protect landscape lighting?
Keep lawnmowers or fertilizers away from landscape lighting fixtures. To protect the glass of the fixtures, you can use a protective glass treatment.
This will prevent the glass from getting foggy due to the weather. Also, position the lighting fixtures where it can’t be damaged by traffic.
How can landscape lighting be cleaned?
You can use a bucket with water and a small amount of detergent to clean the lighting fixtures. Just make sure to unplug the system from the power source before you begin the process.
Get a second bucket ready with plain clean water. This will be used for rinsing. With the help of a soft sponge or piece of cloth, remove dirt, leaves, and dust off the surface of the lights.
Rinse well with a cloth soaked in clean water. Use a clean towel to dry the lights thoroughly.
How far can you run low voltage landscape lighting?
A 12-gauge cable can be spread across 100 feet without dealing with voltage drop issues.
Of course, in this case, the total wattage of the lighting fixtures should be 100 watts or even less. If you want to cover larger distances, you should opt for a bigger gauge.
What should I do if the transformer for my low voltage landscape lighting is not working?
If the transformer is not working, start by checking the power source and verifying that it is receiving electricity. Inspect the transformer for any visible damage or loose connections.
Reset the transformer if it has a reset button. If the issue persists, it may be necessary to replace the transformer with a new one.
How can I ensure proper maintenance of my low voltage landscape lighting system?
Regular maintenance is essential for optimal performance of low voltage landscape lighting. This includes periodically cleaning the fixtures and lenses to remove dirt or debris, trimming vegetation that may obstruct the light output, checking and tightening wire connections, and inspecting the transformer for any signs of damage or malfunction.
It’s also important to replace bulbs as needed and to conduct routine inspections to identify and address any issues promptly.
Verdict
Low-voltage landscape lighting can be a very cheap solution that will make the outdoor space more pleasant without costing you a small fortune.
With a bit of research and patience, you can install the system on your own, as it requires a couple of hours of work.
The low voltage makes it safe for you to handle and low maintenance costs will prevent the appearance of hard-to-handle energy bills.


